 扫码关注雪糕博客微信订阅号,即可订阅文章更新辣!
其实这已经是PowerDNS集群系统第二次落地了。第一次是在私有的混合云上部署,设计时采用了云上为主、边缘为辅的结构,结合BGP AnyCast+ECMP和PowerDNS官方推荐的架构解决了DNS的高可用、就近查询和负载均衡的问题,上线后一个季度运行正常,还算是挺稳定的。本次,PowerDNS的集群架构将在北京理工大学珠海学院条件装备处落地,为全校提供统一的DNS服务,替换掉老的勉强能用的DNS系统。
前言
按照惯例,本文仍然是不写细节只写主要过程。除去这些基础的配置流程,还有部分Linux优化和安全等的工作还需进行,请自行查阅相关文档~
整体架构
经过一番讨论~~(阉割)~~,以及结合PowerDNS官方推荐的架构(或者说是原生实现),决定采用如下这样一个拓扑:
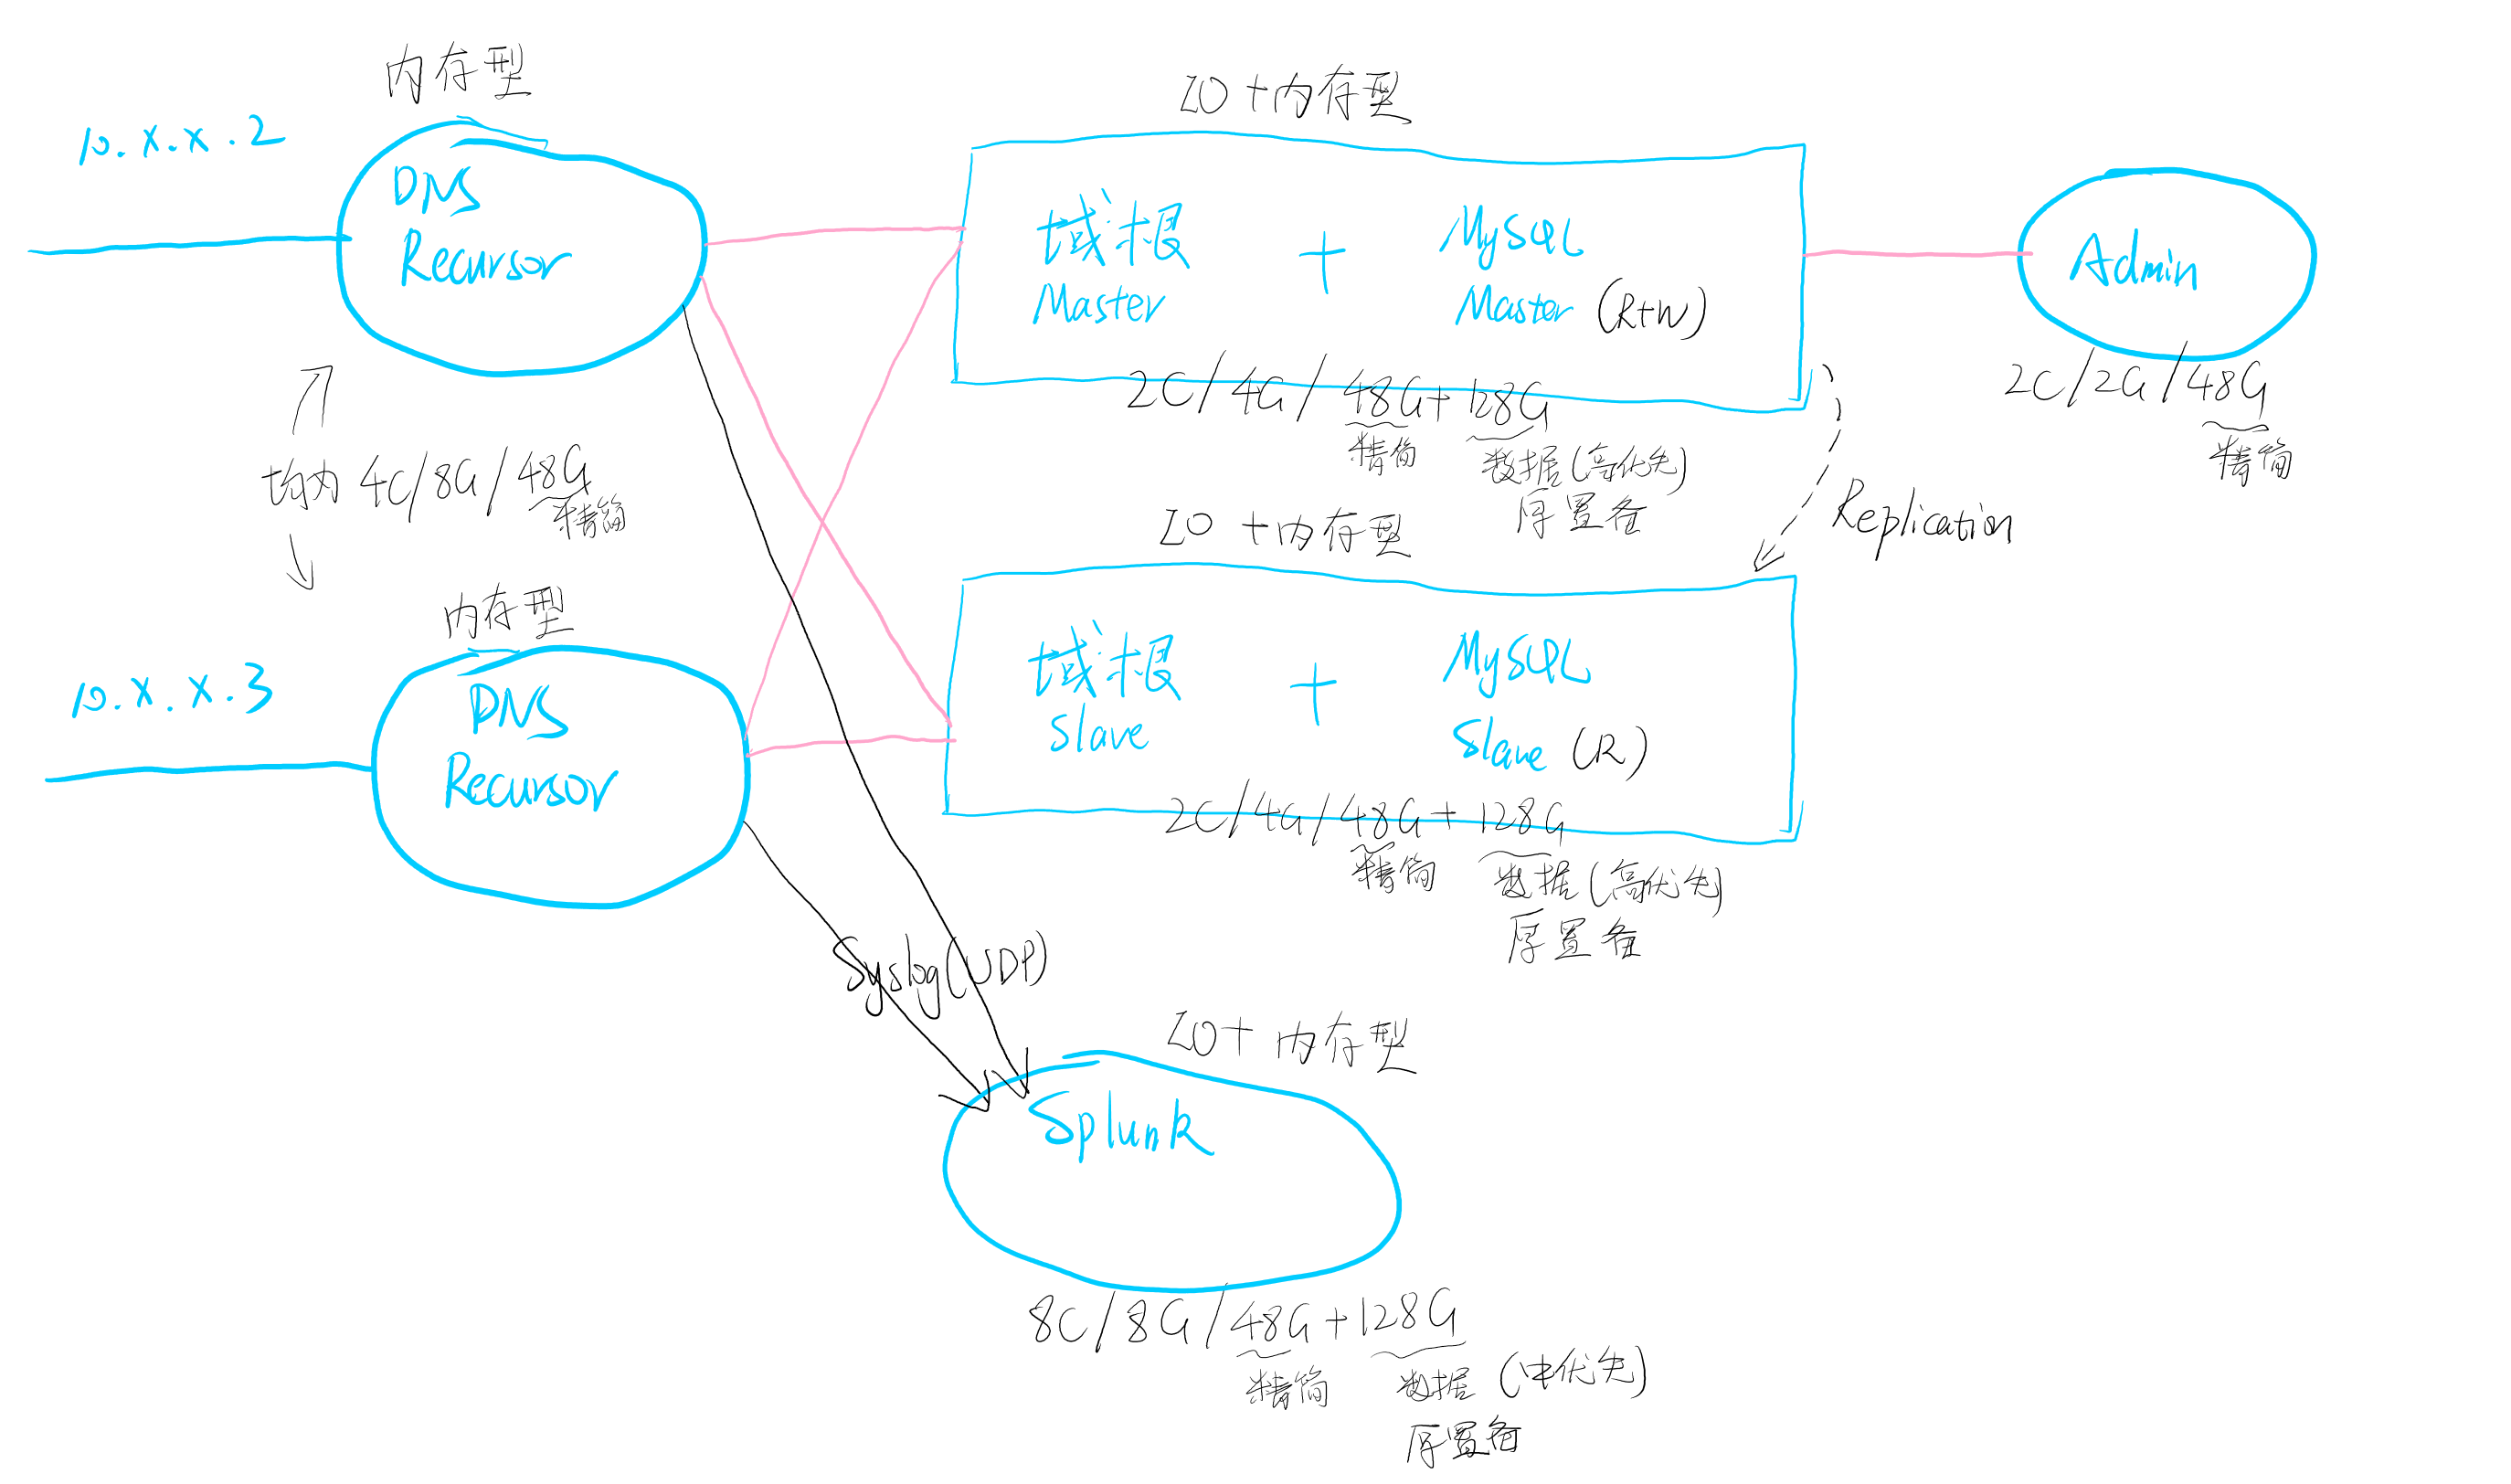
在上图的拓扑中,整体仍然是采用原生的replication方式,只是相比自己混合云中用的方案砍掉了BGP AnyCast和ECMP支持,毕竟学校里边还是不容易有这个环境。没有BGP的情况下,只能通过DHCP指派多个DNS来实现故障冗余,但是不加网关的情况下负载均衡就不是特别好实现了,希望能扛得住吧。
在这样一个拓扑中,两个Recursor主要负责转发查询请求,不过说真的感觉这两个recursor上线后可能负载不会特别平衡,有可能会造成一些问题。而且Windows的DNS是按照顺序进行查询1,第一个DNS查询超时(1秒)后还要等待所有适配器上第一个DNS超时(2秒),然后才会在所有接口的所有DNS上进行查询,这样一个过程下来,如果首台DNS服务器离线,会导致所有用户解析延迟3s,这样一来带来的体验应该非常糟糕了。
此处考虑了一下,关于递归和迭代查询,学校里边,出于DNS加速的层面来看,如果使用迭代查询就没有了意义,因此本处选择使用了递归查询的方式部署DNS服务。
部署MySQL 5.7主从
此处,我选择了使用MySQL 5.7数据库,并开启了GTID主从同步2。
博主我在安装时踩了个坑,我在设置从库的时候忘了设置到只读模式,再加上主库在开启GTID前已经执行了部分操作,然后才又开启GTID,配置了两个库同步。那么这样一来,原本新增的库始终没有同步成功。
回想一下原因,可能是因为我安装数据库后进行了一番操作(新增了个数据库),然后才又去设置了binlog,然后又再去开启了GTID,后边加从库时又忘了置为只读模式,就导致了原本新增的数据库始终无法同步成功,删除原本的库就导致从库同步执行删除失败,然后造成同步线程执行失败退出。
按照官方文档的说法,如果数据库一开始没有设置为GTID模式,则需要将数据库设置为只读模式再配置GTID同步。当前因为变量有两个,因此还没办法确定是修改了binlog名称的原因还是没有开启只读模式的原因,结合官方文档的话暂且只能猜测是忘了设置只读导致的,晚点再做测试吧。双库全部重建并且一开始就启用GTID,并配置同步,就没有了这个问题。
下面内容为安装数据库的过程,此处我选择了使用Docker部署:
# 安装Docker
yum remove docker docker-client docker-client-latest docker-common docker-latest docker-latest-logrotate docker-logrotate docker-engine -y
yum install -y yum-utils -y
yum-config-manager --add-repo https://download.docker.com/linux/centos/docker-ce.repo
yum install docker-ce docker-ce-cli containerd.io -y
mkdir /etc/docker -p
# 关闭Docker默认防火墙和bridge
cat > /etc/docker/daemon.json << EOF
{
    "iptables": false,
    "bridge": "none",
    "registry-mirrors": ["<Docker加速器地址>"]
}
EOF

# 如下步骤按需执行
# 下边这个只是将docker的数据目录迁移出而已,请根据需要调整
mkdir /data/docker -p
cat > /etc/systemd/system/docker.service << EOF
[Unit]
Description=Docker Application Container Engine
Documentation=https://docs.docker.com
After=network-online.target firewalld.service containerd.service
Wants=network-online.target
Requires=docker.socket containerd.service

[Service]
Type=notify
# the default is not to use systemd for cgroups because the delegate issues still
# exists and systemd currently does not support the cgroup feature set required
# for containers run by docker

# -g参数指定docker数据目录
ExecStart=/usr/bin/dockerd -H fd:// --containerd=/run/containerd/containerd.sock -g /data/docker
ExecReload=/bin/kill -s HUP $MAINPID
TimeoutSec=0
RestartSec=2
Restart=always

# Note that StartLimit* options were moved from "Service" to "Unit" in systemd 229.
# Both the old, and new location are accepted by systemd 229 and up, so using the old location
# to make them work for either version of systemd.
StartLimitBurst=3

# Note that StartLimitInterval was renamed to StartLimitIntervalSec in systemd 230.
# Both the old, and new name are accepted by systemd 230 and up, so using the old name to make
# this option work for either version of systemd.
StartLimitInterval=60s

# Having non-zero Limit*s causes performance problems due to accounting overhead
# in the kernel. We recommend using cgroups to do container-local accounting.
LimitNOFILE=infinity
LimitNPROC=infinity
LimitCORE=infinity

# Comment TasksMax if your systemd version does not support it.
# Only systemd 226 and above support this option.
TasksMax=infinity

# set delegate yes so that systemd does not reset the cgroups of docker containers
Delegate=yes

# kill only the docker process, not all processes in the cgroup
KillMode=process
OOMScoreAdjust=-500

[Install]
WantedBy=multi-user.target
EOF
# 如上内容根据实际需要调整

# 新增MySQL配置
# 注意根据目录自行调整
# 注意如下MySQL参数请根据实际需要调整,下方的配置一定不可能适合所有的场景和硬件配置!
mkdir /data/mysql-config -p
cat > /data/mysql-config/my.cnf << EOF
# Copyright (c) 2017, Oracle and/or its affiliates. All rights reserved.
#
# This program is free software; you can redistribute it and/or modify
# it under the terms of the GNU General Public License as published by
# the Free Software Foundation; version 2 of the License.
#
# This program is distributed in the hope that it will be useful,
# but WITHOUT ANY WARRANTY; without even the implied warranty of
# MERCHANTABILITY or FITNESS FOR A PARTICULAR PURPOSE.  See the
# GNU General Public License for more details.
#
# You should have received a copy of the GNU General Public License
# along with this program; if not, write to the Free Software
# Foundation, Inc., 51 Franklin St, Fifth Floor, Boston, MA  02110-1301 USA
#
# The MySQL  Server configuration file.
#
# For explanations see
# http://dev.mysql.com/doc/mysql/en/server-system-variables.html
[mysqld]
pid-file        = /var/run/mysqld/mysqld.pid
socket          = /var/run/mysqld/mysqld.sock
datadir         = /var/lib/mysql
secure-file-priv = NULL
bind-address    = 0.0.0.0

log-bin=mysql-xbinlog
binlog_format=mixed

# server-id记得修改
server-id   = 2
expire_logs_days = 30

!includedir /etc/mysql/conf.d/
EOF

mkdir /data/mysql-config/conf.d -p

cat > /data/mysql-config/conf.d/docker.cnf << EOF
[mysqld]
skip-host-cache
skip-name-resolve
EOF
cat > /data/mysql-config/conf.d/xuegao.cnf << EOF
[mysqld]
query_cache_size = 16M
query_cache_limit = 128M
max-connections = 65535
innodb_thread_concurrency = 8
innodb-buffer-pool-size = 64M
innodb_buffer_pool_instances = 8
innodb_flush_method = O_DIRECT
innodb_log_buffer_size = 64M
innodb_log_file_size = 32M
EOF

mkdir /data/mysql-data -p

# 启动容器
docker run --restart=always --name database -it -v /data/mysql-data:/var/lib/mysql \
    -e MYSQL_ROOT_PASSWORD="<数据库ROOT密码>" --network host -v /data/mysql-config:/etc/mysql \
    -d mysql:5 \
    --character-set-server=utf8mb4 --collation-server=utf8mb4_unicode_ci

# 开一个PMA便于管理
# 此处根据个人需求可以选择不开
docker run --name phpmyadmin -it -d -e PMA_HOST=127.0.0.1 --network host phpmyadmin
是否需要启动只读模式
This step is only required when working with servers which are already replicating without using GTIDs. For new servers proceed to Step 3. Make the servers read-only by setting the read_only system variable to ON on each server by issuing the following
Setting Up Replication Using GTIDs, MySQL Document v5.7
从官方的文档2中,我们可以看到,设置只读只需要在已经启用复制但是没有启用GTID的机器上。由于上边我把GTID配置一开始就写进了配置文件中,因此应该可以认为这些机器一开始就支持GTID(我没验证),直接配置同步即可。
当然,为了保险起见,还是在所有机器上启用了只读模式。其中,在新建用户时,需要特别留意使用传统的加密方式3,新的加密方式暂时还不确定会不会有什么潜在问题
docker exec -it database mysql -u root -p

# 新建复制用户
# 请根据实际情况调整如下配置
USE mysql;
CREATE USER '<用户名>'@'<主机名或者IP>' IDENTIFIED WITH mysql_native_password BY '<密码>';
GRANT REPLICATION SLAVE ON *.* TO '<用户名>'@'<主机名或者IP>' REQUIRE NONE WITH MAX_QUERIES_PER_HOUR 0 MAX_CONNECTIONS_PER_HOUR 0 MAX_UPDATES_PER_HOUR 0 MAX_USER_CONNECTIONS 0;

# 将数据库置为只读模式
SET @@GLOBAL.read_only = ON;
那么接下来,就可以开始在从库设置同步了:
CHANGE MASTER TO
	MASTER_HOST = '<主机名或者IP>',
	MASTER_PORT = 3306,
	MASTER_USER = '<同步用户>',
	MASTER_PASSWORD = '<密码>',
	MASTER_AUTO_POSITION = 1;

START SLAVE;
如上的信息需要根据实际情况修改。
这时候,日志里边就可以看到同步线程开始工作了:

当检查日志没有错误并且确认同步已经正常开始之后,就可以退出只读模式了,但是!此处我的从库只用来配合PowerDNS的Slave完成查找DNS记录,因此应当保持只读模式。
初始化PowerDNS数据库
当正常完成上边操作之后,新建数据库,即可看到PowerDNS的数据库自动完成了主从同步:
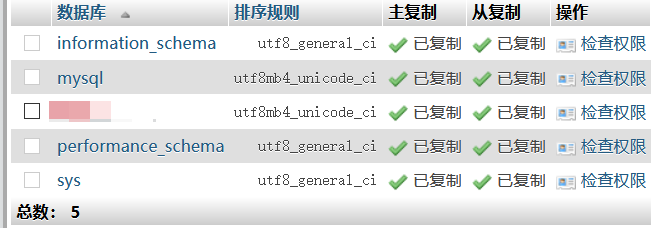
同时,从库的数据库中也能看到复制的对勾,说明一切正常,即可开始使用~
此处初始化PowerDNS的数据库的内容,请查看PowerDNS的官方文档4~
配置域根主从
考虑到域根的负载并不会特别高,因此只简单配置了一下。下边为Mater的配置,Slave的就对比官方文档修改一些配置即可:
allow-axfr-ips=10.0.10.0/24
api=yes
api-key=<自行生成API KEY>
config-dir=/etc/pdns
default-soa-content=<NS名称> i.xuegaogg.com. 0 10800 3600 604800 3600
disable-axfr=no
disable-syslog=yes
distributor-threads=4
guardian=yes
launch=gmysql
gmysql-host=127.0.0.1
gmysql-user=<用户名>
gmysql-password=<密码>
gmysql-dbname=<数据库名>
local-address=0.0.0.0
local-port=53
master=yes
setgid=pdns
setuid=pdns
slave=no
webserver-address=0.0.0.0
webserver-allow-from=10.0.10.0/24
max-cache-entries=12884901
reuseport=yes
确保文件权限正确,权限错误的情况下pdns服务启动时日志里会提示无法访问配置文件。
配置Recursor
两台Recursor保持一致配置即可。
allow-from=127.0.0.0/8, 10.0.0.0/8, ::1/128, fc00::/7, fe80::/10
allow-trust-anchor-query=no
any-to-tcp=no
client-tcp-timeout=3
daemon=no
disable-syslog=no
distributor-threads=4
forward-zones=xxxx.com.=10.0.x.x:53;10.0.x.x:53, xxxxx.edu.cn.=10.0.x.x:53;10.0.x.x:53, 10.in-addr.arpa.=10.0.x.x:53;10.0.x.x:53
forward-zones-recurse=.=x.x.x.x:53
local-address=0.0.0.0
local-port=53
log-timestamp=yes
lowercase-outgoing=no
max-cache-entries=12884901
max-cache-ttl=86400
max-mthreads=2048
max-packetcache-entries=500000
max-udp-queries-per-round=10000
network-timeout=1000
pdns-distributes-queries=no
reuseport=yes
security-poll-suffix=
setgid=pdns-recursor
setuid=pdns-recursor
threads=4
udp-source-port-avoid=11211
udp-source-port-max=65535
udp-source-port-min=10240
由于后期我要配合Splunk统计每周期DNS查询量和缓存命中率,因此此处没有禁用syslog,对于不需要记录日志的朋友,该功能可以关闭。当然,systemd的service中,默认直接写死了禁用syslog,需要手工去掉该参数才可。
在这样一个配置里,我保持了reuseport开启并且将pdns-distributes-queries关闭,参照官方文档5中的说法,这样的配置可以使每个工作线程共享监听同一个socket,同时可以避免惊群效应,提高多核处理器的性能。在Recursor启动之后,日志中即可看到在以epoll模式运行(即事件驱动),各位可以去Google自行查找相关内容,本文不再多提~
配置PowerDNS Admin
原本打算自己封一个Docker Image,一直没时间整,只能先去Docker Hub找些用了。
此处我使用的pschiffe的pdns-admin-uwsgi和pdns-admin-static镜像,由于其使用了uwsgi启动PDA(PowerDNS Admin的简写),因此外层需要使用一个网关套一下。
pdns-admin-static就是一个nginx的镜像。在pdns-admin-static这个容器中,nginx通过主机名找到uwsgi的容器IP,但是,我使用了host命名空间的情况下,并没有办法使用Docker的link,通过主机名访问只能通过在宿主上修改hosts文件,添加uwsgi的容器名到hosts并且指向127.0.0.1即可。
如下命令只是容器的启动参数,注意下边有的地方是"''",即双引号里还有单引号,确认没有错误,请不要删除单引号或者双引号,否则会导致容器启动失败。因为双引号是给docker看的,内部的单引号才应该是带入到PDA配置文件中并且指导启动的。
mkdir /data/powerdns-admin/upload -p

docker run -it -d --name pdns-admin-uwsgi  --restart=always \
  -v /data/powerdns-admin/upload:/opt/powerdns-admin/upload \
  -e PDNS_ADMIN_SQLA_DB_HOST="'<数据库IP>'" \
  -e PDNS_ADMIN_SQLA_DB_PORT="'3306'" \
  -e PDNS_ADMIN_SQLA_DB_USER="'<数据库用户名>'" \
  -e PDNS_ADMIN_SQLA_DB_PASSWORD="'<数据库密码>'" \
  -e PDNS_ADMIN_SQLA_DB_NAME="'<数据库名>'" \
  -e PDNS_API_URL="<API URL>" \
  -e PDNS_API_KEY="<API KEY>" \
  -e PDNS_VERSION="<版本号>" \
  --network=host \
  pschiffe/pdns-admin-uwsgi:ngoduykhanh

docker run -d -it --name pdns-admin-static --restart=always \
  --network=host \
  pschiffe/pdns-admin-static:ngoduykhanh
接入Splunk统计查询量等数据
此处,我需要看到DNS每个周期经受了多少查询请求,以及需要了解其缓存命中率,并且结合系统的整体负载评估DNS系统基准性能,并指导后续调整。
此处,我选择使用Splunk接受syslog发出的PowerDNS Recursor的日志,此处也不再过多讨论syslog的实现原理和Splunk的安装过程,这些内容请各位自行查找~
接下来,我只需要在recursor上开启日志传送到syslog即可,再配置syslog将日志外发到Splunk,即可完成所有需要。
其他
完整显示主机名
CentOS中,主机名会显示在每行命令之前,好比:[root@HOSTNAME ~]# ,那么也就有一个问题,当主机名中包含小数点的时候,主机名显示会被自动截断,虽然是符合规范了,但是偶尔有时候我们习惯性把IP地址带进主机名去,这样一来难免也同样会被截断,这时候就需要手工修改一下PS1这个变量了,重新定义一下格式即可~
echo "export PS1='[\u@\$(/bin/hostname) \W]\\\$ '" >> /etc/profile && source /etc/profile
生成精简的配置文件
众所周知,Linux中的配置文件一般都会带有注释,这为运维人员带来了极大的方便,但是有时候我们只是需要一份配置而已,这样一大堆注释反而让人看花了眼,不好寻找重点。
这时候,可以尝试使用grep配合正则,反向匹配掉空行和#开头的内容即可,进而即可得到精简后的配置文件(不含注释和空行):
grep -v '^$\|#' <Input File> > <Output File>
参考资料
DNS Processes and Interactions. https://docs.microsoft.com/en-us/previous-versions/windows/it-pro/windows-server-2008-R2-and-2008/dd197552(v=ws.10)?redirectedfrom=MSDN ↩︎
Setting Up Replication Using GTIDs. MySQL Document v5.7. https://dev.mysql.com/doc/refman/5.7/en/replication-gtids-howto.html ↩︎ ↩︎
Casey McMullen. How to Run MySQL 8.0 with Native Password Authentication. https://medium.com/@crmcmullen/how-to-run-mysql-8-0-with-native-password-authentication-502de5bac661 ↩︎
Generic MySQL backend. https://doc.powerdns.com/authoritative/backends/generic-mysql.html ↩︎
PowerDNS Recursor Settings. https://docs.powerdns.com/recursor/settings.html#reuseport ↩︎