 扫码关注雪糕博客微信订阅号,即可订阅文章更新辣!
由于部分业务安全敏感程度略高,使用密码认证相对来说又有些low,故此处配置SSL客户端认证来进行身份验证
自签发证书
操作系统为CentOS7 。先创建个文件夹,干净些
# mkdir private
# cd private
自签发CA
# openssl genrsa -des3 -out ./ca.key 4096
提示输入口令时输入设定的口令
签发3年有效期的CA(1095天)
# openssl req -new -x509 -days 1095 -key ./ca.key -out ./ca.crt
期间会提示输入CA Key的口令等
Enter pass phrase for ./ca.key:
You are about to be asked to enter information that will be incorporated
into your certificate request.
What you are about to enter is what is called a Distinguished Name or a DN.
There are quite a few fields but you can leave some blank
For some fields there will be a default value,
If you enter '.', the field will be left blank.
-----
Country Name (2 letter code) [XX]:城市名称
State or Province Name (full name) []:街道或者省
Locality Name (eg, city) [Default City]:具体位置
Organization Name (eg, company) [Default Company Ltd]:组织名称
Organizational Unit Name (eg, section) []:部门
Common Name (eg, your name or your server's hostname) []:通用名称(重要)
Email Address []:邮箱
这一步完成后,就完成了CA的自签发,不过很可惜因为这个CA是我们自己签发的,并不像公共CA一样在系统中默认就被信任了,所以我们还要将CA证书导入Windows的信任的颁发机构中,后续使用此CA签发的证书才能够被系统信任
修改OpenSSL配置文件
此处,我先将OpenSSL的配置文件备份到了当前目录下并且创建了副本再修改,保证生成的文件全部在一个目录中
# cp /etc/pki/tls/openssl.cnf .
# cp ./openssl.cnf ./openssl.cnf.bak
# vim openssl.cnf
手动修改openssl.cnf中的dir位置到当前目录,改成下边这样的
[ CA_default ]

dir             = /usr/local/nginx/conf/ssl/private             # Where everything is kept
然后将openssl.cnf复制到原本的目录中
# cp openssl.cnf /etc/pki/tls/
cp: overwrite ‘/etc/pki/tls/openssl.cnf’? y
# openssl ca -name CA_default -gencrl -keyfile ./ca.key -cert ./ca.crt -out ./ca.crl -crldays 1095
输入CA口令
/usr/local/nginx/conf/ssl/private/index.txt: No such file or directory
unable to open '/usr/local/nginx/conf/ssl/private/index.txt'
140148921628560:error:02001002:system library:fopen:No such file or directory:bss_file.c:402:fopen('/usr/local/nginx/conf/ssl/private/index.txt','r')
140148921628560:error:20074002:BIO routines:FILE_CTRL:system lib:bss_file.c:404:
提示错误,不小心漏了index.txt文件和吊销列表,执行下面的就可以了
# touch index.txt
# echo '01' > ./crlnumber
然后再执行刚刚的命令,使用自签发的CA生成吊销证书列表
# openssl ca -name CA_default -gencrl -keyfile ./ca.key -cert ./ca.crt -out ./ca.crl -crldays 1095
成功
签发用户证书
接下来为用户生成用户证书,为了方便区分用户证书和CA,我创建了user-ssl文件夹将用户证书放在该目录下
# openssl genrsa -des3 -out ./user-ssl/mgr.key 4096
Generating RSA private key, 4096 bit long modulus
..................++
..................................................................................................................................++
e is 65537 (0x10001)
Enter pass phrase for ./user-ssl/mgr.key:
Verifying - Enter pass phrase for ./user-ssl/mgr.key:
# cd ./user-ssl
# openssl req -new -key mgr.key -out mgr.csr
Enter pass phrase for mgr.key:
You are about to be asked to enter information that will be incorporated
into your certificate request.
What you are about to enter is what is called a Distinguished Name or a DN.
There are quite a few fields but you can leave some blank
For some fields there will be a default value,
If you enter '.', the field will be left blank.
-----
Country Name (2 letter code) [XX]:城市名称
State or Province Name (full name) []:街道或者省名
Locality Name (eg, city) [Default City]:位置
Organization Name (eg, company) [Default Company Ltd]:组织名称
Organizational Unit Name (eg, section) []:部门
Common Name (eg, your name or your server's hostname) []:通用名称
Email Address []:邮箱

Please enter the following 'extra' attributes
to be sent with your certificate request
A challenge password []:不用填即可
An optional company name []:不用填即可
完成了证书请求(csr)后接下来再去使用CA签发证书即可
# openssl x509 -req -days 1095 -in ./mgr.csr -CA ../ca.crt -CAkey ../ca.key -CAserial ../serial -CAcreateserial -out ./mgr.crt
Signature ok
xxxxxxxxxxxx此处内容省略xxxxxxxxxxxxxxx
Getting CA Private Key
Enter pass phrase for ../ca.key:
至此签发用户证书完成,所有签发的证书务必留好记录并且定期查验!谨慎签发,如有问题证书需要及时在CA做吊销处理,避免证书被不法利用
# ls
mgr.crt  mgr.csr  mgr.key
# ls -a ..
.  ..  ca.crl  ca.crt  ca.key  crlnumber  crlnumber.old  index.txt  openssl.cnf  openssl.cnf.bak  serial  user-ssl
此时我们就可以看到用户证书
最后,还需要把证书导出,亲测直接把客户端crt导入Chrome并无用……还需要导出成p12证书(私钥)才可以
# openssl pkcs12 -export -clcerts -in mgr.crt -inkey mgr.key -out mgr.p12
Enter pass phrase for mgr.key: 输入客户端证书口令
Enter Export Password: 为空即可
Verifying - Enter Export Password: 为空即可
# ls
mgr.crt  mgr.csr  mgr.key  mgr.p12
将生成的p12证书导入浏览器即可
配置Nginx客户端认证
找到相应的vhost配置文件,在server中加入下面几行即可(建议使用Let’s Encrypt做HTTPS,当然有EV可以用EV,自签发证书做客户端验证)
ssl_client_certificate /xxxxxxx/ca.crt;
ssl_crl /xxxxxxx/ca.crl;
ssl_verify_client on;
然后重新启动nginx即可(生产环境不要restart)
service nginx restart
最后记得还原openssl.cnf,直接使用备份的文件去覆盖即可
cp ../openssl.cnf.bak /etc/pki/tls/openssl.cnf
为了方便管理,我将nginx的目录索引也打开了,在nginx中加入下述配置
location ~ {
    autoindex on;
    autoindex_localtime on;
    autoindex_exact_size off;
}
干脆把HSTS也加上去好了
add_header Strict-Transport-Security "max-age=31536000; includeSubDomains" always;
效果
将用户证书导入证书库的个人中,将自签发的CA也导入受信任的颁发机构,保证系统信任自签发的用户证书,然后去浏览页面时会自动弹出证书认证请求
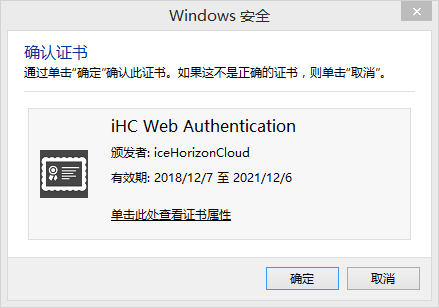
两次授权后就可以正常使用~